Welcome to the complete guide for GuestDock, the industry-standard WordPress plugin for secure, isolated guest authoring. GuestDock is designed to revolutionize how you handle external contributors, saving hours of admin time while keeping your site 100% secure.
This guide is split into two sections: one for Administrators (managing the site and guest authors) and one for Guest Authors (those writing and submitting posts).
Official Download Link: https://wordpress.org/plugins/guestdock/
🛠️ Part 1: For Administrators
GuestDock allows you to invite contributors securely without exposing your WordPress backend, media library, or other users’ posts. By utilizing a restricted “Sandbox,” guests can only see and manage their own content and media files.
1. Configuration & Settings
Before inviting guests, configure your site’s rules. Navigate to GuestDock -> Settings in your WordPress dashboard.
- Content QA Rules: Enforce minimum and maximum word counts, require featured images, require excerpts, and limit the number of external links allowed.
- Category Locking: Restrict guest posts to specific pre-approved categories.
- Custom Instructions: Provide pre-filled writing guidelines that will be visible inside the guest’s dashboard and their post editor.
- Media Security: Set maximum file size limits (e.g., 2MB) for guest uploads. Strict MIME type validation prevents malicious file uploads and server abuse.
- Mail Customization: Fully customize the subject and body of automated emails for Invites, Feedback, Approvals, and Requests.
2. Allowing Frontend Guest Requests
You can allow visitors to apply for guest access directly from your site.
- Create a new page (e.g., “Write for Us”).
- Add the shortcode.
- When users submit this form, you will receive an email notification to review their request.
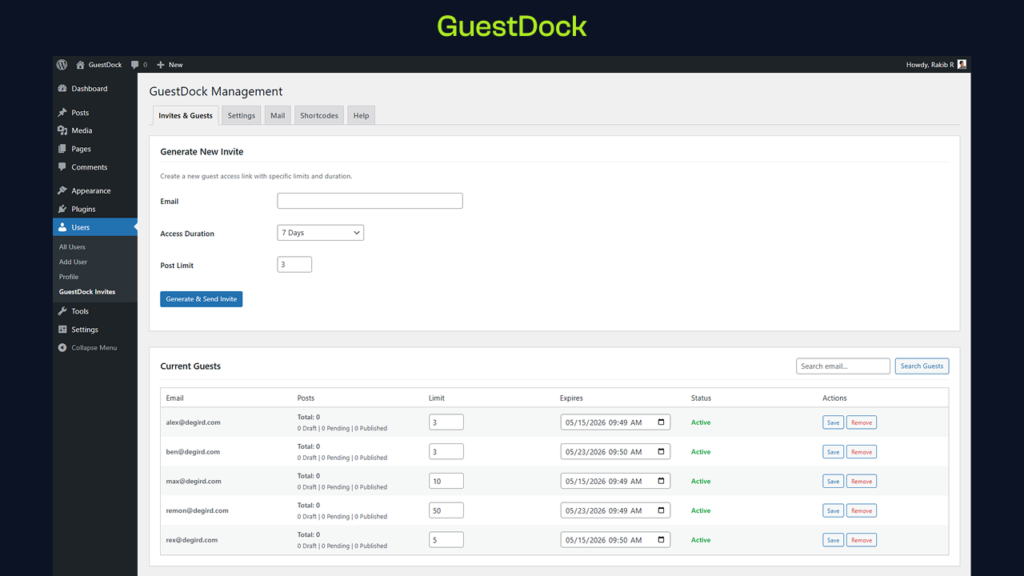
3. Inviting a Guest Author
To invite someone to write for your site:
- Go to GuestDock -> Invites & Guests.
- Enter the prospect’s email address.
- Set the Access Duration (e.g., 7 days or a custom expiration date).
- Set the Post Limit (e.g., allow them to submit only 3 posts).
- Click Generate & Send Invite. An auto-generated username will be created, and the guest will receive an email to set their password.
4. The Editorial Workflow (Reviewing Submissions)
Guest authors can only “Submit for Review”—they cannot publish directly.
- When a post is submitted, you will receive an email alert.
- Go to Posts -> All Posts and look for Pending posts.
- Open the post. At the bottom of the editor, you will find the Admin Feedback box.
- Needs Work? Type your feedback notes and click Send Feedback & Return to Draft. The guest is immediately notified and can view your notes inside their editor.
- Ready to go? Simply review the content and click Publish. GuestDock automatically injects rel=”nofollow sponsored” attributes to all external links in guest posts to protect your SEO profile from spam penalties.
5. Managing Guest Accounts
- Inline Editing: From the Invites & Guests dashboard, you can quickly edit a guest’s expiration date or post quota inline.
- Smart User Removal: If you delete a guest user, GuestDock will automatically prompt you to safely reassign their published posts to an administrator to prevent any content loss.
- Security Audited: GuestDock automatically secures REST API endpoints and disables XML-RPC access for guest accounts to ensure maximum site security.
✍️ Part 2: For Guest Authors
Welcome! You’ve been invited to contribute a guest post. GuestDock creates a safe “Sandbox” environment—meaning you only have access to your own posts and your own media uploads.
1. Accepting the Invite & Logging In
- Check your email for the invite link from the site administrator.
- Click the link to set your password and log into the WordPress dashboard.
- Note: Your account has an Expiration Date and a Post Limit. You can view these details immediately upon logging into your Guest Dashboard. Once your time or quota expires, you will be automatically locked out.
2. Navigating the Dashboard
Your dashboard is heavily simplified to ensure privacy and focus. You can only:
- View the site’s writing instructions.
- Create new posts.
- View and edit your own drafts or pending posts.
- Upload and manage your own media files.
3. Writing Your Post
Click Posts -> Add New to open the WordPress block editor (Gutenberg).
- Safe Blocks Only: For security, you are restricted to safe layout blocks such as Paragraphs, Images, and Headings. Advanced or code-based blocks are disabled to prevent malicious layout-breaking code.
- Category Selection: The administrator may have locked your post to specific categories. If multiple are allowed, you can check them in the sidebar.
- Admin Instructions: Look for the dedicated instruction panel in your editor sidebar to ensure you’re following the site’s specific guidelines.
4. Meeting the QA Requirements
Before the “Submit for Review” button becomes clickable, you must meet the site’s Content Quality Assurance rules. Dynamic warnings will appear in your editor if a requirement is missing.
| Requirement | Description |
|---|---|
| Word Count | Must reach the minimum (and stay under the maximum) limit. |
| Featured Image | A primary image must be uploaded and set for the post. |
| Excerpt | A short summary of the post is required. |
| External Links | The number of external links must remain under the allowed limit. |
5. Uploading Media
You can upload images to your posts, but please note:
- Isolation: You will not see images uploaded by other users.
- Size Limits: Large files may be blocked depending on the site’s maximum file size limit (e.g., over 2MB).
- Security Validation: All uploads go through strict MIME type checks to ensure they are safe image files.
6. Submitting and Responding to Feedback
- Once your post meets all requirements, click Submit for Review.
- The site administrator will review your work.
- If changes are needed, the post status will revert to Draft and you will receive an email.
Open the post again, and you will see an Admin Feedback note at the top of your editor explaining what needs to be changed. Make the revisions and resubmit!


